
Use Media Module
-
Enable/install “Media” module,
-
Navigate to “/admin/content” and select “Media” tab.
-
Click “Add Media” button to add images and other media as reusable media.
-
For Images select image and upload a reusable image, creates page for image.
Create New Media Type (video)
-
Download and enable/install “Video Embed Field” module:
$ composer require drupal/video_embed_field
-
Enable/install “Video Embed Media” module (will also enable “Video Embed Field” module as a dependency).
-
Navigate to “/admin/structure” and select “Media types” (“/admin/structure/media”).
-
Click “+Add media type” button”, the rest almost identical to setting up a content type.
Set up a Media Field in content type
-
Navigate to “/admin/structure/types” and select “Manage Fields” on a content type, e.g. “Article”.
-
Click “Add Field” button.
-
In “Add a new field” select select “Media” (under subsection “reference”).
-
Give new field a label in the “Label” input, e.g. “Feature asset”. Save and continue.
-
On next page choose Allowed number of values, e.g. keep default of 1. Save field settings..
-
On next page select media types for this field, e.g. “Image” and “Remote Video”. Save settings.
Set up Inline Entity Form on Media Field to add media
-
Download and enable/install “Inline Entity Form” module: $ composer require drupal/inline_entity_form
-
Go to content type or paragraph type that has media field and select “Manage form display” tab, e.g. “/admin/structure/types/manage/article/form-display”.
-
From previous section “Set up a Media Field in content type”, the example field is named “Feature asset”. Change widget select to “Inline entity form - Complex”.
-
For that same field, click gear icon on the right edge to configure the “Inline entity form - Complex” widget, e.g. check boxes “Allow users to add new media entities” and ‘Allow users to add existing media entities”.
-
Click Update button then Save button.
Setup Entity Embed to embed media with the text editor (ckeditor)
-
Download and enable/install “Embed” module:
$ composer require drupal/embed
-
Download and enable/install “Entity Embed” module:
$ composer require drupal/entity_embed
(enabling/installing this module will also enable/install “Embed” module as a
dependency).
-
Navigate to configuration page and click link “Text editor embed buttons” (“/admin/config/content/embed”).
-
On next page click “Add embed button”.
-
On next page add Label, e.g. “Assets”.
-
For “Embed type” select “Entity”.
-
For “Entity Type” select “Media”.
-
Optional, upload a button icon.
-
Save.
-
Add button to editor: Navigate to configuration page and click on “Text formats and editors” link, (“/admin/config/content/formats”).
-
Select a text format to configure, e.g. “Basic HML”.
-
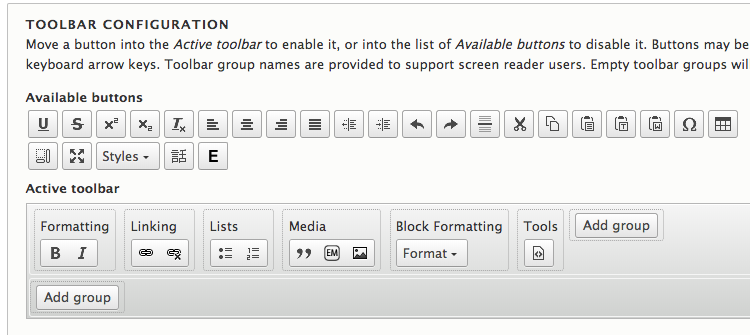
On next page in “TOOLBAR CONFIGURATION”, drag embed media button in “Available Buttons” into the “Active toolbar”, e.g. the “Media” box.
-
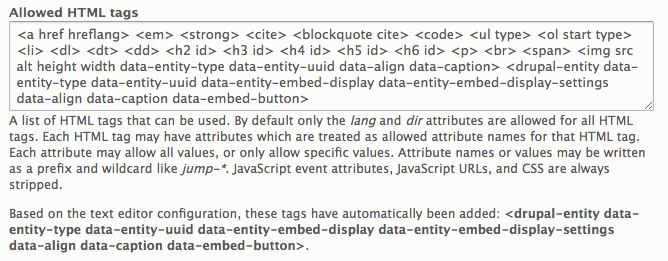
At bottom of page check to make sure “<drupal-entity data-entity-type data-entity-uuid data-entity-embed-display data-entity-embed-display-settings data-align data-caption data-embed-button>” tag is in the “Allowed HTML tags” section. (should have been automatically added).
-
In “Enabled Filters” section select the checkbox for “Display embedded entities”.
-
In “Enabled Filters” section uncheck the checkbox for “Restrict images to this site”.
-
In “Filter processing order” section move “Display embedded entities” into 2nd position from top.
-
Save configuration.
Install Entity Browser for upload and reuse Images
-
Download and enable/install “Ctools” module:
$ composer require drupal/ctools
-
Download and enable/install “Entity Browser” module version 2.0:
$ composer require drupal/entity_browser
-
Download and enable/install “Inline Entity Form” module:
$ composer require drupal/inline_entity_form
(should already have this from previous section “Set up Inline Entity Form on Media Field to add media”).
-
Download and enable/install “DropzoneJS” module version 2.0:
$ composer require drupal/dropzonejs
-
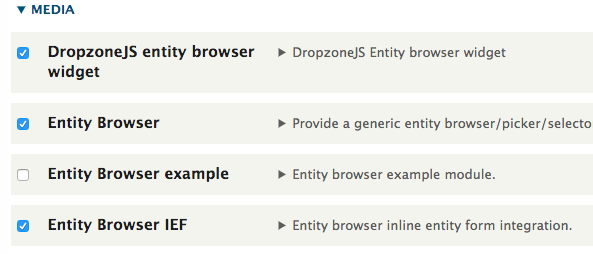
Enable/Install “DropzoneJS entity browser widget” module (this will also install/enable “DropzoneJS” module as a dependency).
-
Navigate to github and download the dropzone project. (“https://github.com/enyo/dropzone”).
-
In docroot find or create the “libraries” directory and place in the dropzone folder. (remove “-master” from directory name).
-
Configure Entity Browser: Navigate to “Configurations” page and click on “Entity browsers” link. (“/admin/config/content/entity_browser”).
-
On next page, click on “+Add Entity Browser” button.
-
On next page, label the entity browser, e.g. “Assets Library”.
-
In “Display plugin” select “iFrame”.
-
Click on “Next” button on bottom of page.
-
On next page select the checkbox for “Auto open entity browser”, then click “Next” button.
-
On next pages click “Next” button if no configurations are available.
-
The next page should then be the “Widgets” page.
-
In “Add widget plugin” select “Upload images as media items, this should insert a blade for this widgets configuration. Rename the label “Upload”, then click “Finish” button.
-
Navigate to the “Configure” page and click link to “Text editor embed buttons” to edit the “Assets” button. (“/admin/config/content/embed/button/manage/assets?destination=/admin/config/content/embed”).
-
On next page, in “Entity browser” section, select newly created “Assets Library”, then save.
-
To access to existing media for the entity browser, create a view to access the media. Navigate to the views page. (“/admin/structure/views”).
-
On “Views” page click “+Add view” button.
-
Name view “Assets Library”, and in “View Settings” section for “Show” select “Media”, then click “save and edit” button.
-
On next page, the view edit page, in “Displays” header, click “+Add” button and select “Entity browser”.
-
Add field, “Entity browser bulk select form”. To create check box for asset selection. (check “Preview” will see checkboxes in the “Content” section, if media was uploaded).
-
On next popup, click “apply” button.
-
Add field “Thumbnail” and click “Add and configure fields” button.
-
On next popup, for “Image style” select “Thumbnail (100x100)”, click “Apply “ button. (check “Preview” will see thumbnail images in “Content” section, if media was uploaded).
-
In “FORMAT” section, convert “Format” from “Unformatted list” to “Table”, click “Apply” button.
-
In next popup, click “Apply” button.
-
In “FIELDS” section click “Add” button and select “Rearrange”.
-
Move checkbox “Entity browser select form” to top/front, and “Name” to bottom/back, click “Apply” button. This should give a display of checkbox, then thumbnail, then name, in a table row.
-
Save the view.
-
Navigate to “Configurations” page and click “Entity browsers” link. (“/admin/config/content/entity_browser”).
-
Click “edit” select on entity browser named “Assets Library”.
-
On the “General information” page click the “Widgets” link at top of page.
-
On the “Widgets” page, in “Add widget plugin”, select “View”.
-
In the “View: View display” section select “Assets Library: Entity browser”.
-
For label rename to “Library”, then click the “Finish” button.
Add Inline Entity Form to Entity Browser to upload/add youtube videos
-
Navigate to Configuration page, select “Entity browsers” link, then click “edit” button to existing “Assets Library” entity browser. (“admin/config/content/entity_browser/assets_library”).
-
At top of “General information” page, click the “Widgets” link. (“/admin/config/content/entity_browser/assets_library/widgets?js=nojs”).
-
On the “Widgets” page, in the “Add widget plugin” section select “Entity Form”.
-
ReLabel the “entity_form” to “Youtube”.
-
In “Entity type” select “Media”, in “Bundle” select “Remote Video”, click “Finish” button.
-
Note: will need a new Tab/blade for each different Bundle. This is inconvenient.
Add Dropzone to Entity Browser for drag and drop new media.
-
Download and install “DropzoneJS” module, this should have already been done in a previous section.
-
Navigate to Configuration page, select “Entity browsers” link, then click “edit” button to existing “Assets Library” entity browser. (“admin/config/content/entity_browser/assets_library”).
-
At top of “General information” page, click the “Widgets” link. (“/admin/config/content/entity_browser/assets_library/widgets?js=nojs”).
-
On the “Widgets” page, in the “Add widget plugin” section select “Media Entity DropzoneJS with edit”.
-
ReLabel the “dropzonejs_media_entity_inline_entity_form” to “Drag and Drop Image”.
-
Select “Image” for “Media type”, then click “Finish” button.
Configure “Feature Asset” Field to use Entity Browser “Asset Library”
-
Go to content type with “Feature asset” field (field widget “Inline entity form - Complex”), and click on gear widget on the right edge.
-
Select “Assets Library” for “Entity browser”, click update.
-
To avoid duplicate “Upload” button, uncheck “Allow users to add new media entities”. The “Allow users to add existing media entities” will display the “Assets Library” which should have upload, and drag and drop image from previous sections.