Drupal 8 custom field display for views
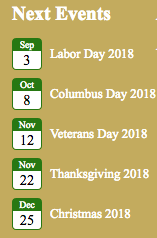
Example 1. Next Events block from Calendar view
-
Create “Events” content type with “Event Date” field,”Location” field,”Details” field, and etc.
-
Create some “Events” pages, at least 5 would be nice.
-
Create view named “Next Events” (../admin/structure/views/add).
-
Set Display to “Block”
-
In “Formats Section” Set Format to “Unformatted List” (UL).
-
In “Formats Section” Set Show to “Fields”.
-
In “Fields” Section “Add” field “Content: Event Date”, set Date format to “Cal Month Short” or “M” in “Formatter” select “Custom” (e.g. Aug) and select “Exclude from display”, leave the rest at default. (see http://php.net/manual/en/function.date.php).
-
In “Fields” Section “Add” field “Content: Event Date”, set Date format to “Cal Day” or “j” in “Formatter” select “Custom” (e.g. 16) and select “Exclude from display”, leave the rest at default. (see http://php.net/manual/en/function.date.php).
-
In “Fields” Section “Add” field “Content: Event Date”, set Date format to “Cal Time” or “g:i A” in “Formatter” select “Custom” (e.g. 10:31 AM) and select “Exclude from display”, leave the rest at default. (see http://php.net/manual/en/function.date.php).
-
In “Fields” Section “Add” field “Content: Details”, and select “Exclude from display”, leave the rest at default.
-
In “Fields” Section “Add” field “Content: Location”, In “STYLE SETTINGS” subsection select “Customize field HTML” and more options will appear.
-
In “STYLE SETTINGS” subsection, select “Create a CSS class”, and in the field that appear labelled “CSS Class” input the class “view-tile” (just an example here, add any class name you want).
-
In “REWRITE RESULTS” subsection select “Override the output of this with custom text” and a “Text” field will appear.
-
In the “Text” box, put in custom text or html, in this case
<div class="next-events wrapper">
<div class="next-events tile">
<div class="cal month">{{ field_event_date }}</div>
<div class="cal day">{{ field_event_date_1 }}</div>
</div>
</div>
-
In “Fields” section select “Rearrange” button (in “Add” button select) and place “Content: Title” at bottom, below “Content:Location”.
-
Set “FILTER CRITERIA” to “Content: Published (=Yes), “Content: Content type (=Events), and Content: Event Date (>= +0 day).
-
Set “SORT CRITERIA” to “Content: Authored on (asc).
-
Save.
-
Create CSS to make buttons out of Next Events view row’s custom HTML as seen in example below: